Ruby in VSCode
Bust A Gem
这个插件和 GitLens 冲突,而且对于 symbol 的解析很有问题,建议不要用。
通过使用 ripper-tags 创建 TAGS 文件,为 Ruby 项目提供 Go to Definition 功能的扩展。
- 添加了 Open Gem… 命令,可以更快速的在新窗口中打开 Gemfile 中引入的 gem
- 为 Ruby 项目提供有限度的 Go to Symbol in File… 支持
Installation
- 在 VS Code 中安装 Bust A Gem 扩展
- 使用
gem install ripper-tags或者在项目的 Gemfile 中添加gem 'ripper-tags' - 如果使用 Gemfile 的方式安装,需要在 VS Code 的 Settings 中搜索
bustagem.cmd.rip改成bundle exec ripper-tags -f TAGS -R --force --extra=q以便使用 bundler
如果安装之后在使用的时候遇到 ripper-tags 的错误信息,利用 VS Code 的 Help > Toggle Developer Tools 查看更多的 debug 信息。
使用
在第一次使用 Go to Definition 时,ripper-tags 会在项目的根目录下创建 TAGS 文件。默认它只会为项目代码创建索引,如果我们想把依赖 gem 也加入索引,以便 Go to Definition 可以跳如 gem 内部,则需要修改设置。
"bustagem.gems": ["activerecord", "devise", ...]
另外 Bust A Gem 不会自动重建索引,你只能手动执行 Rebuild 命令来更新 TAGS 文件。
ruby-rubocop
rubocop is code analyzer for ruby,所以这个扩展也是要装一下的。它的功能包括:
- 通过命令
Ruby: lint by rubocop执行 lint 功能 - 保存文件时自动调用
- 通过命令
Ruby: autocorrect by rubocop来自动校正
Installation
- 在 VS Code 中安装 ruby-rubocop 扩展
- 使用
gem install rubocop
配置和使用
可以自行修改默认的快捷键绑定。
{ "key": "ctrl+alt+l",          "command": "ruby.rubocopAutocorrect",
                                "when": "editorLangId == 'ruby'" }
可以通过编辑 File > Preferences > Workspace Settings 的 settings.json 来修改配置
{
  // If not specified searches for 'rubocop' executable available on PATH (default and recommended)
  "ruby.rubocop.executePath": "",

  // You can use specific path
  // "ruby.rubocop.executePath": "/Users/you/.rbenv/shims/"
  // "ruby.rubocop.executePath": "/Users/you/.rvm/gems/ruby-2.3.2/bin/"
  // "ruby.rubocop.executePath": "D:/bin/Ruby22-x64/bin/"

  // If not specified, it assumes a null value by default.
  "ruby.rubocop.configFilePath": "/path/to/config/.rubocop.yml",

  // default true
  "ruby.rubocop.onSave": true
}
solargraph
Solargraph 基于 Language Server Protocol 为 IDE 实现了 Ruby 语言的代码补全和自动文档功能。LSP 请参考相关连接。
安装
gem install solargraph- 安装扩展 vscode-solargraph
Solargraph 的功能
Writing Documentation
Solargraph 集成了 YARD 可以为 classes, modules, methods 提供丰富的文档。
# The Foo class
#
class Foo
  # The bar method
  #
  # @return [String]
  def bar
  end
end
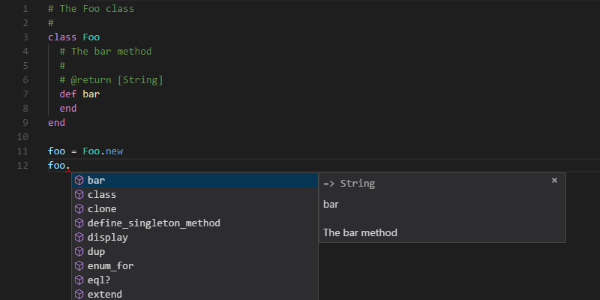
你可以看到 Foo 类和 bar 方法会出现在 VS Code 的快捷提示窗口中。bar 方法的 @return 也很方便的显示了出来。还有 @param 或者 @yieldparam 等等有用的标签,可以直接看 YARD tag documentation 文档。
Detecting and Documenting Variable Types
Solargraph 可以通过变量分配的值而自动侦测变量类型。以下任何一种均可被侦测:
- 字面量 Literal values (strings, numbers, arrays, and hashes)
- 通过 new 方法创建的对象,比如
Hash.new - 被调用的方法,其文档中包含返回类型
var1 = "hello"        #=> String
var2 = var1.join(',') #=> Array
var3 = Foo.new        #=> Foo (given the above Foo class)
var4 = var3.bar       #=> String (given the above Foo class)
Solargraph 当增加了一个特殊的标签 @type 来记录文档变量。可以将其放在变量之上来标明该变量的类型,可用在 local variables, instance variables, class variables, constants。例如:
# @type [String]
my_string = a_method_that_returns_a_string
Documenting Gems
如果 gem 遵序 YARD 文档规范,那 Solargraph 就可以提供自动完成等相应的功能。但是你需要先在命令行下执行 yard gems 来为 gem 生成文档,VS Code 的扩展也提供了生成文档的快捷键和命令。
Configuring Projects
Solargraph server 会在项目的根目录下寻找 .solargraph.yml 配置文件。你可以在项目的根目录下执行 solargraph config 生成默认的配置文件。
默认的配置文件如下:
---
include:
- "**/*.rb"
exclude:
- spec/**/*
- test/**/*
- vendor/**/*
require: []
reporters: []
domains: []
plugins: []
max_files: 5000
各参数的详细介绍可以直接看 solargraph 配置参数介绍
Ruby (by Peng Lv)
未完待续懒得写
还不如学好如何在 VS Code 中好好用 Terminal
[
  { "key": "ctrl+`", "command": "workbench.action.terminal.focus",
                        "when": "!terminalFocus" },
  { "key": "ctrl+`", "command": "workbench.action.focusActiveEditorGroup",
                        "when": "terminalFocus" }
]
我把 ` ctrl+ 快捷键改成在激活的 terminal 窗口和上一个活动窗口之间切换。